Roof leaks are one of the most frustrating and destructive problems a property owner can face. Left unchecked, a small damp spot on a ceiling can rapidly turn into severe structural timber rot, damaged electrical wiring, ruined insulation, and hazardous mold growth.
Whether you manage an industrial facility, own a commercial building, or want to protect your family home, understanding how roof waterproofing works—and choosing the right method—is essential for maintaining your property value.
Why Is Roof Waterproofing Essential?
Roofs bear the brunt of extreme weather conditions daily. Intense solar heat, severe thunderstorms, wind, and standing water continuously test the integrity of your building’s outer shell.
Investing in high-quality roof waterproofing provides crucial advantages:
- Prevents Expensive Structural Damage: Water ingress degrades concrete, corrodes steel reinforcement, and rots wooden trusses.
- Protects Indoor Air Quality: Persistent moisture leads to toxic black mold and mildew growth inside walls and ceilings.
- Extends Roof Lifespan: A properly sealed and maintained roof can last decades longer, delaying costly complete roof replacements.
- Increases Energy Efficiency: Specialized solar-reflective waterproof coatings help reduce heat absorption, keeping indoor temperatures cooler during summer months.
Common Types of Roof Waterproofing Systems
Different roof designs require specific waterproofing solutions. Choosing the right membrane or liquid barrier depends on roof slope, foot traffic, and existing building materials.
1. Torch-On Membrane Waterproofing
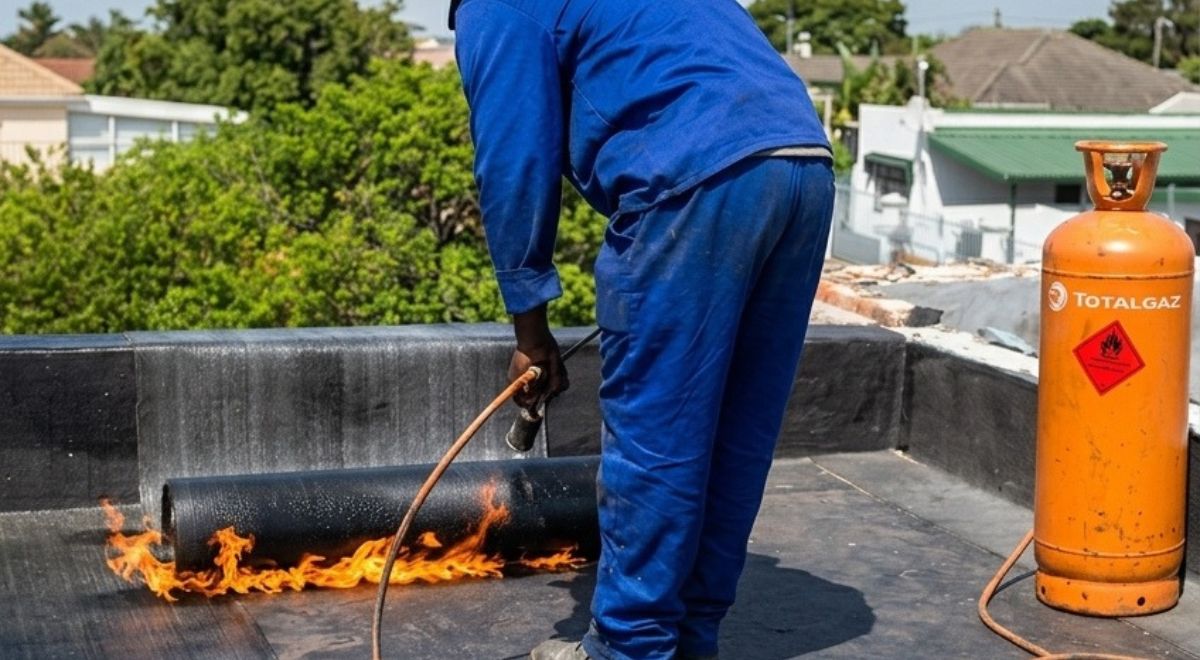
Torch-on waterproofing is the gold standard for flat roofs, concrete slabs, box gutters, and balconies.
- How It Works: Certified installers apply a heavy-duty 4mm bitumen membrane modified with polymers. Using a propane burner, the underside of the sheet is heated and fused directly onto a primed substrate.
- Best For: Flat concrete roofs, heavy water collection areas, and commercial properties requiring maximum durability.
2. Liquid Acrylic and Polymer Coatings
Liquid waterproofing involves applying seamless liquid coats reinforced with a flexible fiber mesh membrane.
- How It Works: A liquid compound is painted or sprayed onto the surface, embedding a structural fabric mesh between coats. As it cures, it forms a flexible, elastic, continuous rubberized skin.
- Best For: Tiled roofs, corrugated iron, pitched metal roofs, and detailed flashing points around chimneys or vents.
3. Bituminous Coatings and Sealants
Bituminous paints and emulsions are liquid-based solutions ideal for quick sealing, maintenance coats, and gutter repairs.
- Best For: Metal roof lap joints, valley gutters, and sealing fixing screws or bolts on zinc roofs.
Warning Signs That Your Roof Needs Waterproofing
Catching roof leaks early saves thousands in repair costs. Watch out for these early warning signs:
- Damp Patches or Discolored Ceilings: Dark rings or yellowed stains on interior ceilings indicate active water penetration.
- Flaking Paint or Plaster on Walls: Blistering paint near rooflines or corners signals trapped moisture behind plaster.
- Musty Odors: A persistent damp smell indoors often points to hidden moisture in roof cavities or ceiling insulation.
- Ponding Water on Flat Roofs: If water remains pooled on a flat roof for longer than 48 hours after rain, the drainage gradient or membrane system is failing.
- Visible Cracks on Parapet Walls: Cracks in plaster or concrete parapet walls allow rainwater to seep directly into structural brickwork.
The 4 Steps to a Successful Waterproofing Job
Professional application makes all the difference between a long-lasting seal and a recurring nightmare. A complete waterproofing installation requires strict attention to detail:
- Step 1: Thorough Surface Preparation
Existing dirt, moss, loose concrete, and flaking old coatings must be completely stripped or high-pressure washed away. Waterproofing membranes will not adhere properly to dirty or unstable substrates. - Step 2: Primer Application
Applying a specialized bitumen or acrylic primer penetrates concrete pores and maximizes mechanical adhesion for the secondary layers. - Step 3: Membrane and Barrier Application
Whether installing 4mm torch-on sheets or liquid embedded mesh systems, continuous coverage and leak-proof seam overlaps are critical. - Step 4: Protective UV Topcoat
Unprotected bitumen membranes degrade under direct sunlight over time. Applying a solar-reflective silver or aluminum protective paint protects the membrane from UV radiation and prolongs its lifespan significantly.
How to Maintain Your Waterproofing System
Even the best waterproofing systems require basic routine care to perform at their peak:
- Clear Gutters Regularly: Keep gutters, downpipes, and drainage outlets free from leaves and silt buildup to prevent water backing up.
- Inspect After Severe Storms: Check flat roofs and flashings for wind damage, debris puncture marks, or loose seams after heavy weather events.
- Apply Reflective Maintenance Coats Every 3 to 5 Years: Reapplying silver reflective paint onto torch-on membranes keeps the underlying bitumen supple and protected against intense sun exposure.
Get Expert Roof Protection
Roof waterproofing is a specialized technical trade that requires proper equipment, quality materials, and experienced workmanship. Attempting temporary DIY fixes often leads to hidden water accumulation and structural damage beneath the surface.
If your property is showing signs of roof leaks or needs routine preventative maintenance, contact Mike Waterproofing today for expert site assessments, professional torch-on membrane installations, and long-lasting roof repair solutions.
- Phone: +27 81 746 7042
- Email: mukwenaunivester@gmail.com
- Service Region: Johannesburg and Greater Gauteng Region, South Africa